Our Blog
The $98 Billion Problem: Why 96% of Companies Are Failing at AI (And How the Elite 4% Are Winning)
AI was supposed to revolutionize how we work. Instead, it’s creating a productivity paradox that could cost Fortune 500 companies $98 billion annually in lost returns on their AI investments. According to Atlassian’s groundbreaking 2025 AI Collaboration Index—a comprehensive study surveying 180 Fortune 1000 executives and 12,000 knowledge workers across six countries—we’re witnessing an uncomfortable truth: AI is making individuals more productive, but organizations aren’t transforming.

The Productivity Illusion: Why Individual Gains Don’t Equal Business Success
The numbers initially look promising. Daily AI usage has nearly doubled in just one year, with workers reporting an average 33% productivity boost and saving approximately 1.3 hours per day. The share of people who consider AI useless has plummeted by 78%, while those viewing AI as a strategic partner jumped 27%. Leaders have embraced this shift too—74% of knowledge workers say their leaders now foster safe environments for AI experimentation, up from 60% in 2024.
But here’s where the story takes a troubling turn. Despite these impressive individual gains, 96% of companies have not seen dramatic improvements in organizational efficiency, innovation, or work quality. Only 3% of executives report transformational improvements in organizational efficiency, a mere 2% see dramatic work quality improvements, and just 4% have achieved innovation breakthroughs. Zero IT leaders—not one—report that work quality across all teams has dramatically improved.

The Fatal Flaw: Why AI-Powered Productivity Without Coordination Fails
The root cause? An overemphasis on AI-enabled personal productivity at the expense of coordination. A staggering 76% of executives view increased employee productivity as the primary indicator of AI ROI. But research reveals this focus is fundamentally misguided. Organizations hyper-focused on personal productivity as the main AI outcome are 16% less likely to drive organization-wide innovation compared to those focused on coordination.
When coordination isn’t prioritized, individual productivity gains can actually worsen existing problems. 37% of executives admit AI has wasted their teams’ time or led them in the wrong direction. The disconnect is stark: 42% of workers admit to trusting AI outputs without verifying accuracy due to time pressures, despite only one in three people fully trusting AI. Perhaps most concerning, one in three knowledge workers use unapproved AI tools for work tasks—and the true number is likely higher. When teams work with disconnected AI tools, silos deepen and security risks multiply.
The Elite 4%: Three Strategies That Separate Winners from Losers
So what separates the 4% of organizations achieving transformational benefits from everyone else? Companies focused on AI-enabled coordination are nearly twice as likely to report that AI has significantly transformed organization-wide efficiency. These elite performers do three things differently:
1. Build a Connected, Company-Wide Knowledge Base
The transformational companies understand that 79% of knowledge workers would use AI more if it could access the right data and information. They’ve fundamentally changed how teams work by making knowledge available to AI at the core of everything they do.
These organizations adopt “AI-first collaboration practices”—brainstorming in digital whiteboards, collaborating in shared pages, and including AI notetakers in live meetings to give AI context without additional work. At Atlassian, for example, they start each project with a clear “project poster” documenting the challenge and intended impact, enabling AI to better steer teams in the right direction.
Crucially, they give AI accurate context by documenting high-quality information with clear owners, tags, and statuses. By marking pages as “draft” or “verified,” teams help AI—and other teams—know what information should and shouldn’t be shared across the organization.
2. Set Up the Right Systems to Enable AI-Powered Coordination
Winning organizations document 3-5 clear goals per team within a centralized platform, laddering each one up to department- and organization-wide milestones. When AI knows every goal, it can drive teamwork in the right direction, quickly flag duplicative work, and connect the right people, projects, and knowledge.
They adopt integrated systems of work, recognizing that silos limit AI’s ability to provide insights and direction. As one Fortune 500 SVP explains: “To deploy enterprise AI at scale, you need to have the plumbing set up to get the data flowing through the systems properly”.
These companies also establish clear policies to accelerate confidence in AI. They create transparent guidelines and smaller community spaces where people feel safe asking questions, avoiding overly punitive approaches that stifle experimentation.
3. Make AI Part of the Team
Transformational organizations empower every team—not just technical teams—to experiment with AI. Companies that give all teams freedom to use AI, even if their strategy isn’t fully defined, are twice as likely to make innovation gains than slower adopters.
But here’s the counterintuitive finding: formal training and self-serve knowledge hubs are among the least effective ways to spark strategic AI collaboration, despite being the most common approaches (offered by 69% and 57% of organizations, respectively). Instead, AI learning happens best in small, active communities organized around shared problems—champion-led workshops with live demos or hackathons where teams integrate AI into specific workflows.
The data reveals that managers are pivotal to driving effective adoption. Knowledge workers who have seen their manager model AI are 4x more likely to consistently experiment with AI and 3x more likely to be strategic AI collaborators.
The Future of Work: Three Predictions from the Frontlines
Looking ahead, the research identifies three key trends:
Winning companies will work with AI to move teamwork forward. To drive business value, AI capabilities must be embedded into the organization, integrated into existing systems, and enabled for wide use.
AI will lead to more hiring, not less. If AI significantly frees up employees’ time, 79% of executives say they would redirect their teams’ focus toward delivering better customer outcomes over reducing costs. As AI empowers companies to adapt and seize new opportunities, workforce needs may actually increase.
AI will increase burnout unless we restructure the workday. With busywork eliminated, employees are left with only cognitively demanding work—removing natural breaks and increasing mental strain.
Rethinking AI ROI: New Metrics for a New Era
To capture real return on AI investments, leaders need to stop optimizing solely for personal productivity metrics like time saved or tasks automated. Instead, they should track team- and organization-level outcomes across three dimensions:
Organizational Efficiency: Is AI helping teams solve existing problems with less effort? Track metrics like time savings on repeatable tasks, percentage of tasks automated, ticket cycle time, and employee experience.
Work Quality: Is AI consistently making it easier to create high-quality outputs? Monitor reduced error rates, customer feedback improvements, and stronger performance on KPIs like proposal win rates or candidate offer acceptance.
Innovation: Is AI empowering teams to do things that weren’t possible before? Measure experiment cycle time, percentage of projects using new capabilities, number of new patents or prototypes, and new product offerings with associated revenue.
The Bottom Line: Coordination Before Productivity
The message from Atlassian’s research is clear: AI-powered productivity doesn’t lead to coordination, but AI-powered coordination leads to the productivity that drives mission-critical outcomes.
As one Head of Digital at a Fortune 1000 financial services company put it: “At this moment, AI doesn’t help collaboration between teams. That’s a big pain point. How can it actually make teams work better together?”
The answer lies not in doubling down on individual productivity tools, but in fundamentally reimagining how AI connects teams, projects, and knowledge across the entire organization. The 4% who’ve figured this out are already pulling ahead. The question for everyone else is: how long can you afford to wait?
About the Research: The 2025 AI Collaboration Index is based on research from Atlassian’s Teamwork Lab, surveying 180 Fortune 1000 executives and 12,000 knowledge workers across the United States, United Kingdom, Australia, India, Germany, and France. Respondents come from diverse industries including technology, financial services, and healthcare, representing both SMB and enterprise organizations.


How to enable Controlled Folder Access on Windows
Ransomware is a type of malware that will secretly install itself on your computer or cell phone and proceed to encrypt almost all of your files. It will scramble all your filenames and extensions half the time. Read more…
Enable Controlled Folder Access
- Go to the Start Menu and look for Windows Defender Security Center.

- Go to Virus & threat protection, and click on Virus and threat protection settings.
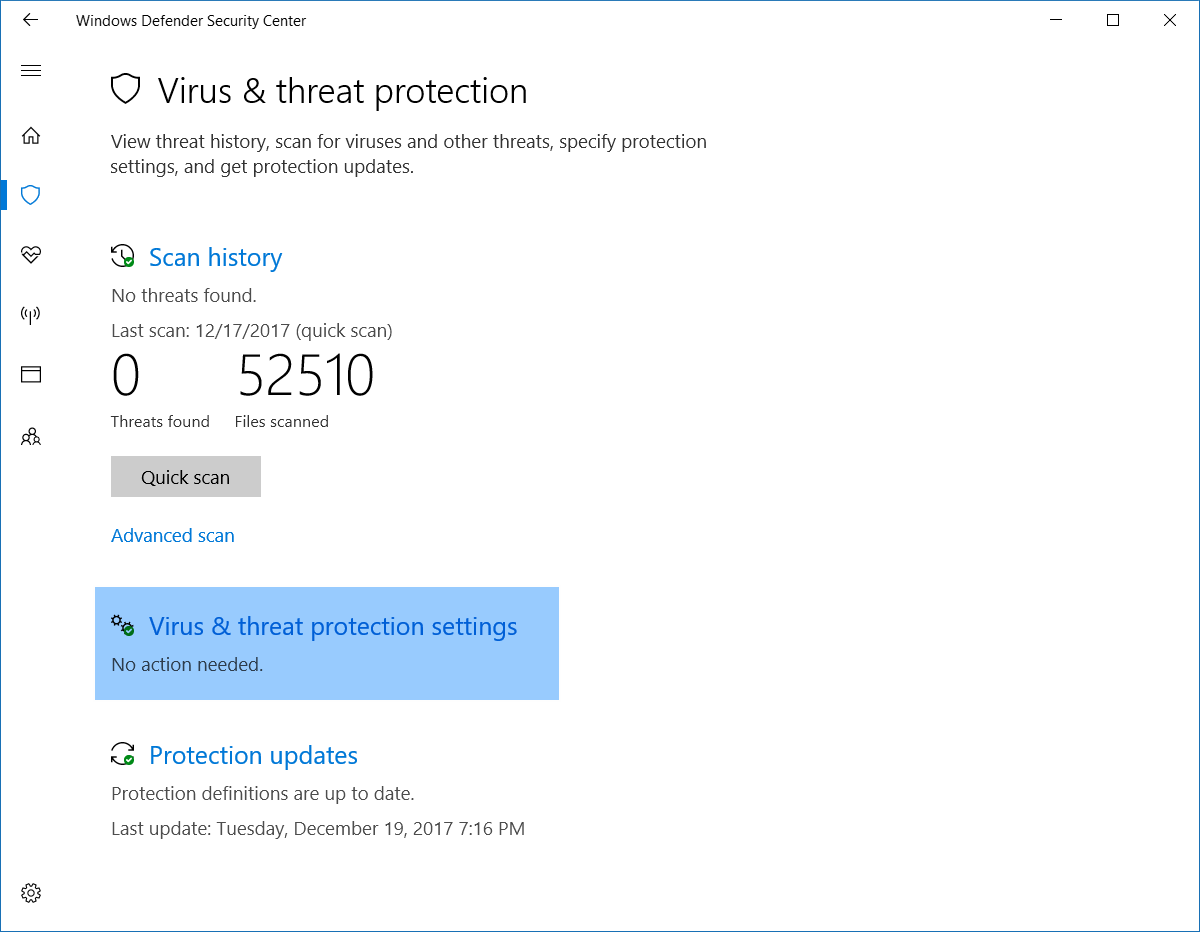
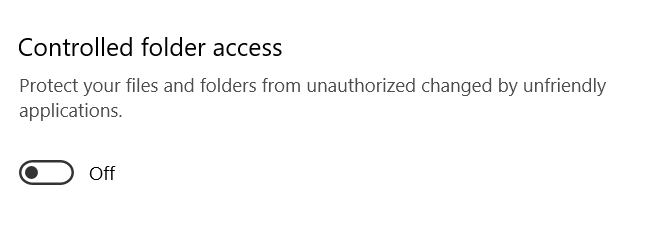
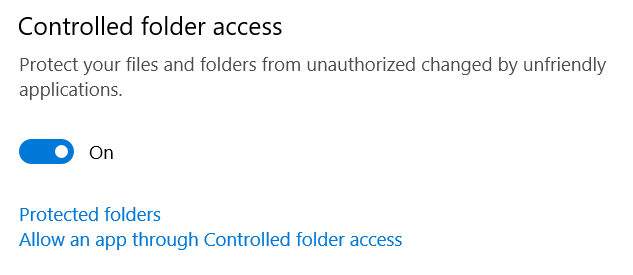
- Scroll down and look for the Controlled folder access option. Switch to On
Note: When asked by Windows if you want to allow the app to make changes, click Yes.
How to use OneDrive Files On-Demand
OneDrive users can now benefit from the new Files On-Demand feature that comes with latest Windows 10 update. Before, you could either have your files online or synced to your computer. The problem with having all your data synced is the space that it takes from your computer’s hard drive. On the other hand, having all your files online means you have to use the Web interface all the time.
Files On-Demand will allow you to see all your files stored on OneDrive from your computer, using File Explorer, without having to download them first. Let’s take a look at how you can enable this feature and how it works.
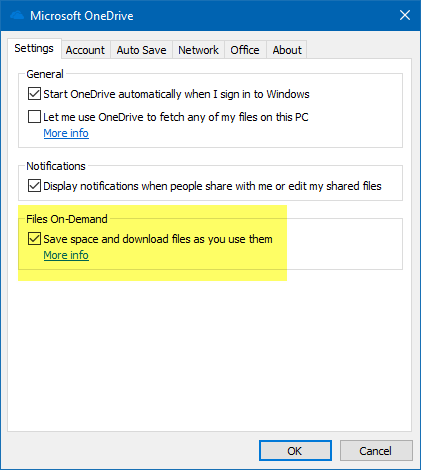
Enable OneDrive Files On-Demand
- Look for the OneDrive icon on the taskbar.

- Right-Click on the icon and select Settings.

- Go to the Settings tab and look for the Files On-Demand section. Check the Save space and download files as you use option and click OK.
New File Status
After you enable Files On-Demand, you will notice that your files have one of the following icons next to them. These will let you know the status of the files.

Online-only
Files only exist online and don’t take up any space on your computer.

Locally available
The online-only file gets downloaded to your computer when you open it. A local copy will now be available all the time on your computer, even if you don’t have an internet connection.

Always available
Files with this mark will always be available on your computer.
Note: If you don’t need or want the file to be locally/always available all the time, right-click the file and select the Free up space option.
Click here to learn more.

Using Text to Columns feature in Excel
Today, we show you how to use the Text to Columns Wizard in Excel. This feature could be very useful when you need to split a piece of information into multiple columns. For example, a list of clients with the first and last names combined into one cell.

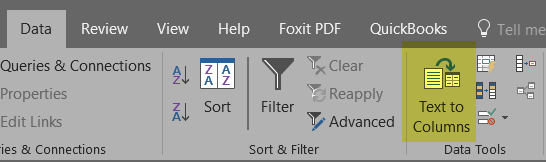
Text to Columns Wizard
- Select the list of names that you want to split into columns.
- Go to the Data menu and select Text to Columns to see Wizard screen.
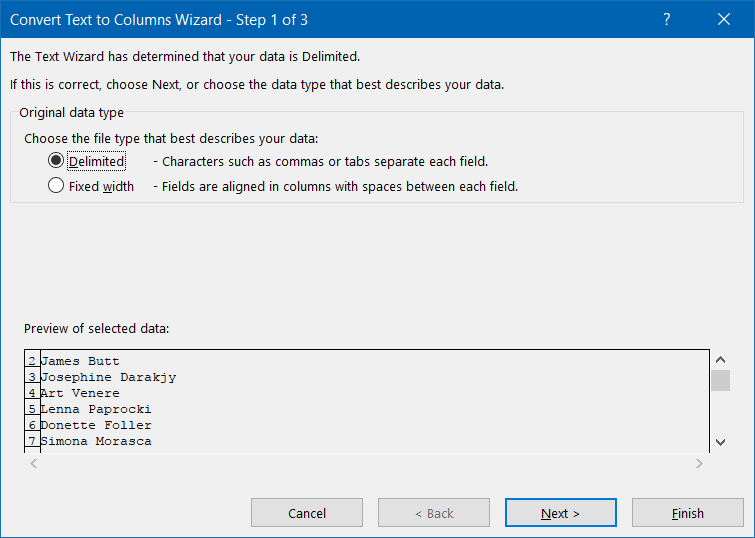
- Check the Delimited option
- For our example, we are going to use the Space delimiter.
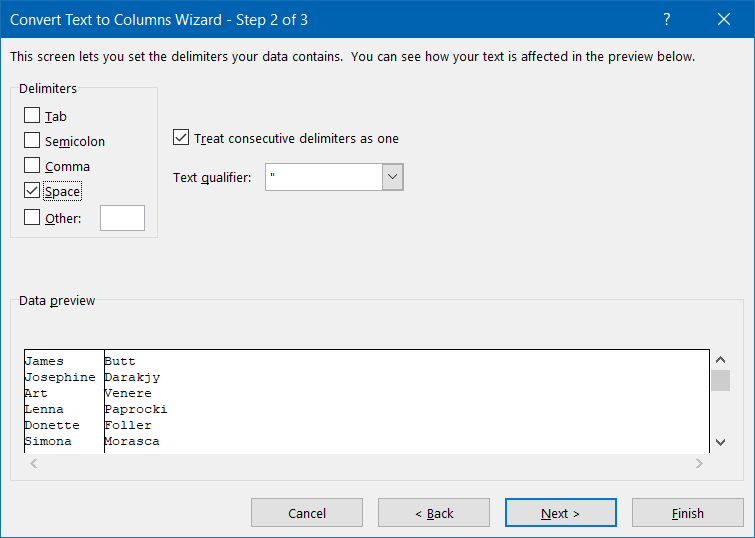
Notice how Excel splits the name into columns in the preview window.
- For this example, leave the data format as General and Destination as is. Then, click Finish.
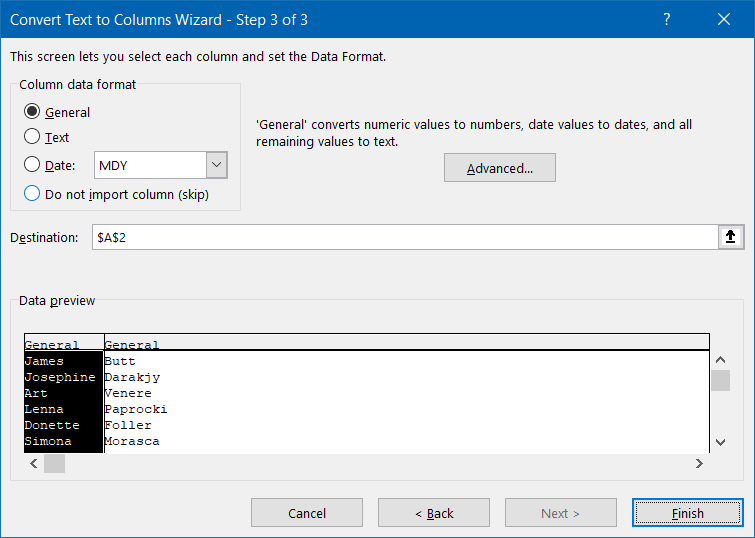
The result is the Client’s name divided into two columns. Hope you find it useful.


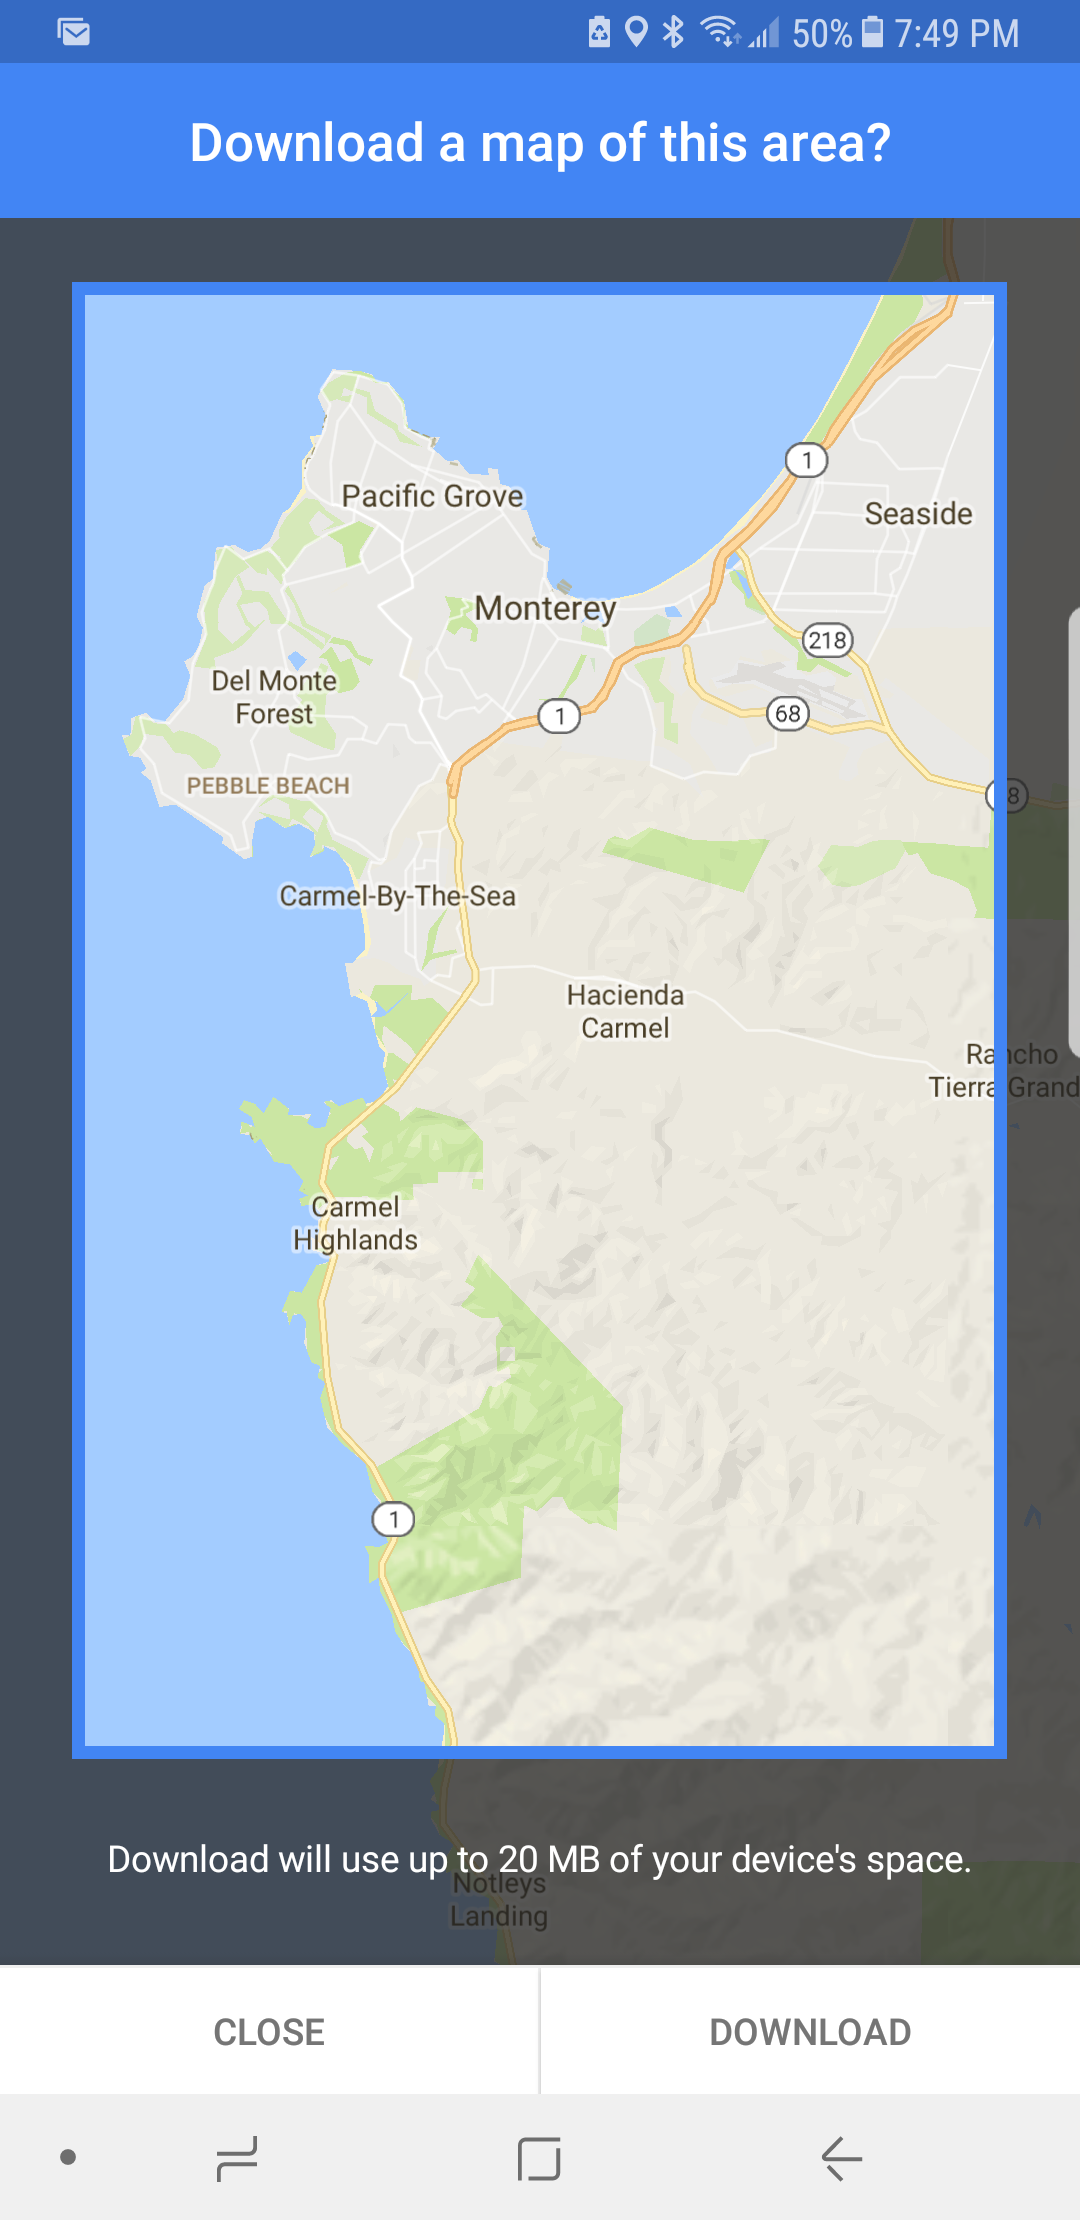
How to use Google Maps offline
Download Google Maps
- Open the Google Maps app on your phone.
- Find the map area you need to download.
- If you searched for a specific place, you should see a bar with the name at the bottom. Just tap it to see more options.
Note: If you don’t have a specific place yet, you can search for the area and zoom in to find the place.
- Click Download.
- You can now choose to make the download area larger or smaller.
- After making your selection click the Download button in the lower-right corner.
Keep in mind you may need extra storage space depending on how big the map is. Fortunately, you can change the preferences and have the maps saved to an SD card. To do so, just go to Menu > Offline Areas > Settings > Storage Preferences and switch “Device” to “SD card.”


Find Downloaded Maps
- Open the Google Maps app on your phone.
- Go to Menu > Offline Maps.
Note: This area allows you to see all the maps you have saved. You can update, rename, view or delete any of the maps you see in this section.